


The Complete Automation Workflow Guide: Build Your First Lead Magnet Sequence in 30 Minutes
Tim Biden had a confession during our mastermind call.
"I have done almost everything I've done without the instruction from the Pykthos system," he admitted. "It did not work with the way my mind works."
He'd built a basic workflow but had no idea if it was right or wrong. Sound familiar?
By the end of our session, Tim had a functioning lead magnet automation, understood newsletter list building, and knew exactly how to test his workflows.
Let me show you exactly what we built, step by step, so you can do the same in your practice.
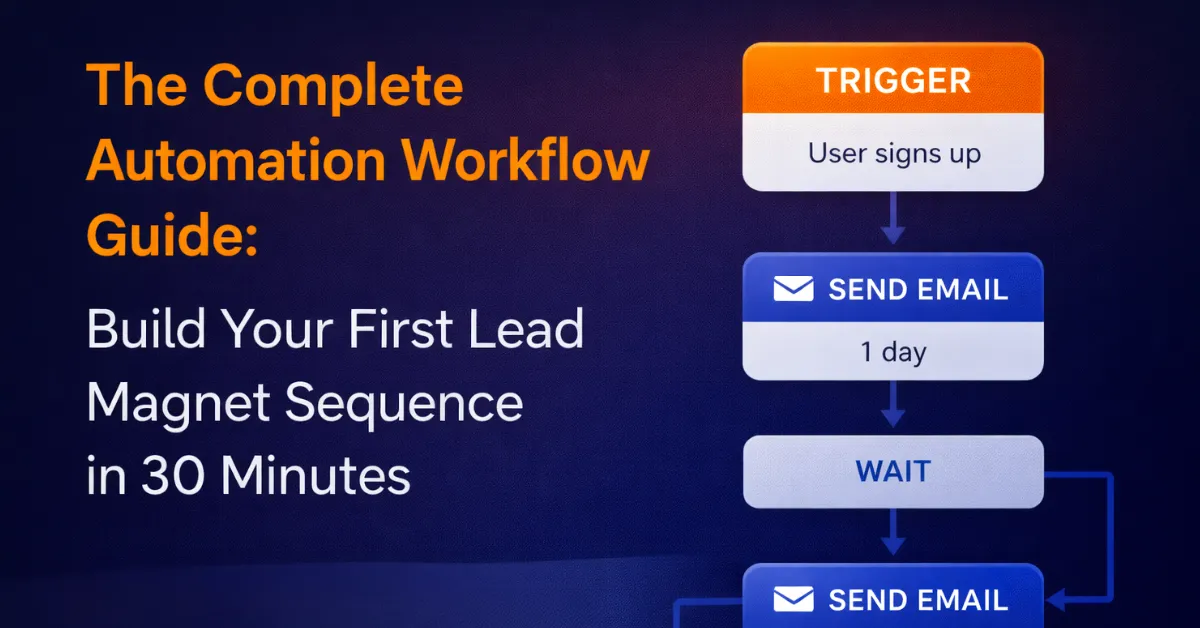
The Core Concept: Triggers and Actions
Every automation has two parts:
1. The Trigger - What starts the automation (like pulling a gun trigger)
2. The Actions - What happens next (the bullet flying)
That's it. Everything else is just variations on this theme.
Tim's workflow started with a Form Submitted trigger. When someone fills out his NPR MP3 form, the automation fires.
Step 1: Set Up Your Form Trigger
Click on your workflow's first element - the trigger.
You'll see a dropdown asking which form should trigger this workflow.
Critical naming convention: Don't leave forms with default names like "Contact Step 1."
As Timothy said: "This is a great example of why you always want to name your forms something that you'll absolutely know for certain, this is what it is."
Name it specifically: "Webinar Sign-Up" or "NPR MP3 Lead Magnet" or "Discovery Call Form."
When you're troubleshooting at 11 PM, you'll thank yourself.
Step 2: Tag Your New Lead
The first action after your trigger should be adding a tag.
Tags are like sticky notes on someone's contact record. They tell you and your system what this person has done.
For Tim's workflow, we created a tag called "NPR MP3" (Neural Pain Resolution MP3).
Tag naming best practices:
Use the format "LeadMagnet-NameOfMagnet"
No spaces if possible (or accept lowercase)
Be specific enough that you'll understand it months later
Consider dating them if you run multiple versions ("Webinar-Feb2024")
Why tag immediately? Because tags drive everything else in your system - segmentation, reporting, future workflows.
Step 3: Send Your Delivery Email
Next action: Send the thing they asked for.
Tim's email had:
From Name: Hard-coded as "Tim Biden" (not "User First Name" variable)
From Email: His business email (never use Gmail/Yahoo for sending)
Subject: "Your Pain Relief MP3 is Ready (plus what happens next)"
Body: Plain text, conversational, no fancy design
His email copy was mostly written by Claude, and I loved it. As I told him: "I like the way you write, just in plain English for people too, no bullshit, kind of just straight up, boom, here's the goods."
Pro tip on the From Email: That user.email variable pulls from YOUR login email. If you log into Pykthos with a Gmail, your emails will fail. Use your business domain email instead.
Step 4: Add a Notification for Yourself (Optional)
Tim included a "Send Email to Myself" action that alerts him when someone downloads his MP3.
This is great when you're starting out. You'll feel the dopamine hit of "I got a lead!"
Eventually, as I mentioned on the call, when you're getting 30 of these a day, you'll delete this step because it clogs your inbox. But that's a good quality problem.
Step 5: Wait and Follow Up
After delivery, add a Wait Step.
Naming convention matters here too: Name it "Wait 2 Days" not just "Wait Step," and set the wait value to match.
Why? When you're looking at your workflow three months from now, you'll instantly know how long you're waiting without clicking into each step.
After the wait, add another email. Then another wait. Then another email.
This is your nurture sequence - the emails that build relationship and move people toward your paid offer.
The Newsletter List Strategy
Don Ray asked the million-dollar question: "Should I have a tag for my newsletter, or wait until after we've talked?"
My answer: Keep it simple. Tag them as newsletter immediately.
Here's why:
If they gave you their email address, they're giving you permission to stay in touch. Include a checkbox at opt-in that says "I agree to receive follow-up emails that will include useful content and the occasional promotional offer."
Now it's explicit. They opted in. Behind the scenes, tag them as "Newsletter" in that first workflow.
Building Your Newsletter Smart List
Once you're tagging people as "Newsletter," create a Smart List to easily email them:
1. Go to Contacts
2. Click Add Smart List
3. Name it "Newsletter"
4. Click Advanced Filter
5. Search for and select Tag
6. Set it to "is" and select your Newsletter tag
7. Save
Now you have a living, breathing list that automatically includes anyone tagged as Newsletter.
When you want to send your weekly email, you just:
1. Go to Marketing > Email
2. Click Create Campaign
3. Write your email
4. Click Send or Schedule
5. Select Send to Smart List
6. Choose Newsletter
Done.
The Cascading Workflow Strategy
For those building more sophisticated sequences, here's an advanced pattern:
Workflow 1: Form to Immediate Response
Trigger: Form submitted
Action 1: Send confirmation email
Action 2: Tag as "Long-Term Nurture"
Workflow 2: Long-Term Nurture Sequence
Trigger: Tag added ("Long-Term Nurture")
Action 1: Email 1
Action 2: Wait 2 days
Action 3: Email 2
Action 4: Wait 3 days
Action 5: Email 3
(Continue for 10-20 emails)
This keeps your workflows modular. The form workflow handles immediate response. The nurture workflow handles long-term relationship building.
Any form in your business can dump people into that nurture sequence by simply adding the "Long-Term Nurture" tag.
Testing Your Workflow: The Critical Step
Tai had built a webinar workflow but wasn't sure if it was working. Nobody was showing up in his execution logs.
The issue? The workflow wasn't published when people signed up.
Here's how to test properly:
1. Make sure your workflow is published (not draft mode)
2. Fill out your own form as a test
3. Check two places:
- Enrollment History (shows who entered the workflow)
- Execution Log (shows each step firing for each person)
If you see yourself in Enrollment History and emails in Execution Log, it's working.
If not, check:
Is the workflow published?
Is the form trigger pointing to the correct form?
Did you save everything?
What To Do With Old Leads
Tai had 11 people who signed up before his workflow was published. They never got his emails.
The fix: Manual enrollment.
1. Go to Contacts
2. Click on the person's name
3. Scroll to Automations in the left sidebar
4. Click + Add
5. Type the name of your workflow
6. Click Add
They're now in the workflow and will receive all your emails.
For bulk enrollment, create a Smart List with filters that capture all those people, then you can bulk-action them into the workflow.
The Custom Values Superpower
Tai's webinar emails had the Google Meet link hard-coded in each email.
Timothy showed him the game-changer: Custom Values.
Instead of typing the meeting link in every email, you:
1. Go to Settings > Custom Values
2. Create a custom value called "WebinarLink"
3. Paste your meeting URL as the value
4. In your emails, insert {{custom_values.WebinarLink}}
Now when your meeting link changes, you update ONE custom value, and every email auto-updates.
Same for webinar date, time, location - anything that might change but appears in multiple places.
As Timothy said: "The way that you have it now, if you change this link, you've given yourself another hour of work."
The Plain Text vs Designed Email Debate
Tim Biden said something that resonated: "I don't generally remain subscribed to the highly designed ones."
I'm the same way. My newsletter emails? Plain text. No fancy design. Just content.
As I told the group about the email I sent that morning: "You saw there was no design. It was just like an email you would write to a friend."
Your choice here depends on your brand and audience, but don't feel pressure to design elaborate emails. Sometimes plain text converts better because it feels personal.
Your 30-Minute Implementation Plan
Minute 0-10: Build the skeleton
Create new workflow
Set form trigger
Add tag action
Add delivery email
Add wait step
Add follow-up email
Minute 10-20: Write your emails
Delivery email (what they asked for)
Follow-up email 1 (related value)
Follow-up email 2 (soft CTA to next step)
Minute 20-25: Create newsletter infrastructure
Add "Newsletter" tag to workflow
Create Newsletter Smart List
Minute 25-30: Test everything
Fill out your form
Check enrollment history
Verify execution log
Confirm emails arrived
That's it. You now have a working lead magnet funnel with nurture sequence and newsletter list building.
The Most Important Thing Tim Learned
By the end of the call, Tim said: "This has been awesome."
But the real win was this: He now understands the logic.
Automations aren't mysterious. They're just:
Trigger (what starts it)
Actions (what happens next)
In order (top to bottom)
Once you grasp that framework, you can build anything.
Ready to build your first workflow? Log into your Pykthos account and navigate to Automations in the left sidebar.
Need help troubleshooting? Join our Friday implementation calls where we help you debug in real-time.
Want to see what we’re about? Check out our FREE Strategy Café where you can get help LIVE, in real time, without ever having to buy a darn thing from us. https://pykthos.com/cafe
